• Contact
  • Cookie Policy
  • Helpdesk
Techspark Blogging about technical stuff

Tag Archives: Synology

Speed-Up/Tune Synology DSM with HDD & SSD

July 7, 2024 8:35 PM / Leave a Comment / XeroX

Did you know the operating system of your Synology named DSM is split in a RAID1 on all attached drives? In RAID1 data is read from all drives but what if we can get those jucy short access times from an attached SSD?

Synology structures the system in the following manner:
/dev/md0 – Operating System
/dev/md1 – Swap Space
/dev/mdx – Your Volumes/Storage Pools

To view your current layout you have to logon via SSH and become root (sudo -i). Running ‘cat /proc/mdstat’ shows the following output:

Personalities : [raid1] [raid6] [raid5] [raid4] [raidF1]
md2 : active raid5 sda5[0] sdd5[3] sdc5[4] sdb5[1]
      XX blocks super 1.2 level 5, 64k chunk, algorithm 2 [4/4] [UUUU]

md3 : active raid1 sdf5[0]
      XX blocks super 1.2 [1/1] [U]

md1 : active raid1 sda2[0] sdf2[4] sdb2[3] sdc2[2] sdd2[1]
      XX blocks [5/5] [UUUUU]

md0 : active raid1 sda1[0] sdf1[4] sdb1[3] sdc1[2] sdd1[1]
      XX blocks [5/5] [UUUUU]

In my case you can see four raidsets. DSM, Swap, Volume 1 and Volume 2. However one of those drives is a SSD (sdf) and as you can see part of md0 and md1.

mdadm (casual linux software raid) allows you to configure a RAID with the attribute ‘writemostly’.

This is valid for RAID1 only and means that the ‘md’ driver will avoid reading from these devices if at all possible. This can be useful if mirroring over a slow link.

Source: https://linux.die.net/man/8/mdadm

Writemostly means, please only write to this drive and don’t try to read. You can achieve that by flagging all rotational drives on md0 (DSM) and md1 (Swap Space) with ‘writemostly’. In my case sda, sdb, sdc and sdd, as sdf is the SSD. We can achieve that with running the following command for each drive in each raidset:

echo writemostly > /sys/block/md0/md/dev-sda1/state
echo writemostly > /sys/block/md0/md/dev-sdb1/state
echo writemostly > /sys/block/md0/md/dev-sdc1/state
echo writemostly > /sys/block/md0/md/dev-sdd1/state

echo writemostly > /sys/block/md1/md/dev-sda2/state
echo writemostly > /sys/block/md1/md/dev-sdb2/state
echo writemostly > /sys/block/md1/md/dev-sdc2/state
echo writemostly > /sys/block/md1/md/dev-sdd2/state

Why is it sda1 and sda2? sda is the physical drive and sda1 is the first partition, sda2 the second and so on. After you did that you will the the following out put of ‘cat /proc/mdstat’:

Personalities : [raid1] [raid6] [raid5] [raid4] [raidF1]
md2 : active raid5 sda5[0] sdd5[3] sdc5[4] sdb5[1]
      XX blocks super 1.2 level 5, 64k chunk, algorithm 2 [4/4] [UUUU]

md3 : active raid1 sdf5[0]
      XX blocks super 1.2 [1/1] [U]

md1 : active raid1 sda2[0](W) sdf2[4] sdb2[3](W) sdc2[2](W) sdd2[1](W)
      XX blocks [5/5] [UUUUU]

md0 : active raid1 sda1[0](W) sdf1[4] sdb1[3](W) sdc1[2](W) sdd1[1](W)
      XX blocks [5/5] [UUUUU]

Saw the (W) after all rotational drives? This shows that mdadm will only try to do write operations on those drives and no reads.

After a restart you can verify your startup times with ‘cat /var/log/synobootup.log’:
Startup finished in 13.354s (kernel) + 2min 46.683s (userspace) = 3min 38ms.

You can do additional verification by running ‘mdadm -D /dev/md0’. -D for detail.

/dev/md0:
        Version : 0.90
  Creation Time : Fri Jul 20 15:51:28 2018
     Raid Level : raid1
     Array Size : XX (XX GiB XX GB)
  Used Dev Size : XX (XX GiB XX GB)
   Raid Devices : 5
  Total Devices : 5
Preferred Minor : 0
    Persistence : Superblock is persistent

    Update Time : Sun Jul  7 21:17:33 2024
          State : clean
 Active Devices : 5
Working Devices : 5
 Failed Devices : 0
  Spare Devices : 0

           UUID xxxxxxxx:xxxxxxxx:xxxxxxxx:xxxxxxxx:xxxxxxxx
         Events : 0

    Number   Major   Minor   RaidDevice State
       0       8        1        0      active sync writemostly   /dev/sda1
       1       8       49        1      active sync writemostly   /dev/sdd1
       2       8       33        2      active sync writemostly   /dev/sdc1
       3       8       17        3      active sync writemostly   /dev/sdb1
       4       8       81        4      active sync   /dev/sdf1

You will see here the ‘writemostly’ flag on all rotational drives. You can always return to the previous state with the following command for each drive:

echo -writemostly > /sys/block/mdX/md/dev-sdX1/state

The result is Synology DSM “mostly” reads from your SSD. “Mostly” because it will start to read from rotational drives again if your SSD(s) fail.

Cheers

Posted in: Synology / Tagged: mdadm, Synology

Synology iSCSI/LUN SSD Cache with DSM 7.0

September 28, 2021 2:31 PM / Leave a Comment / XeroX

UPDATE: Seems to be gone with ‘Flashcache Version : flashcache-1.0-2021-10-18-20:42’ on 7.0.1. 🙁

With DSM 7.0 Synology removed the feature of accelerating Block-Level LUNs. This is an interesting feature for iSCSI LUNs used for Hypervisors like VMware ESX.

Synology DSM 7.0 Release Notes:

- Creating SSD caches on block-level LUNs is no longer supported. Existing SSD caches for block LUNs will function normally after the update.

However this is valid but you can re-enable acceleration for Block-Level iSCSI LUNs.

Logon to your Synology NAS via SSH and get the root shell via “sudo -i”. Execute the following command to re-enable the cache.

/var/packages/ScsiTarget/target/bin/synoiscsihook --flashcache_enable

This works as long as you’re not rebooting. You can create a task within DSM with trigger at “Boot-Up” to execute this command line to enable the Cache again.

Posted in: ESXi, Synology, VMWare / Tagged: Synology, VMWare

Synology Virtual Machine Manager increase vDisk Limit

November 25, 2020 4:11 PM / 7 Comments / XeroX

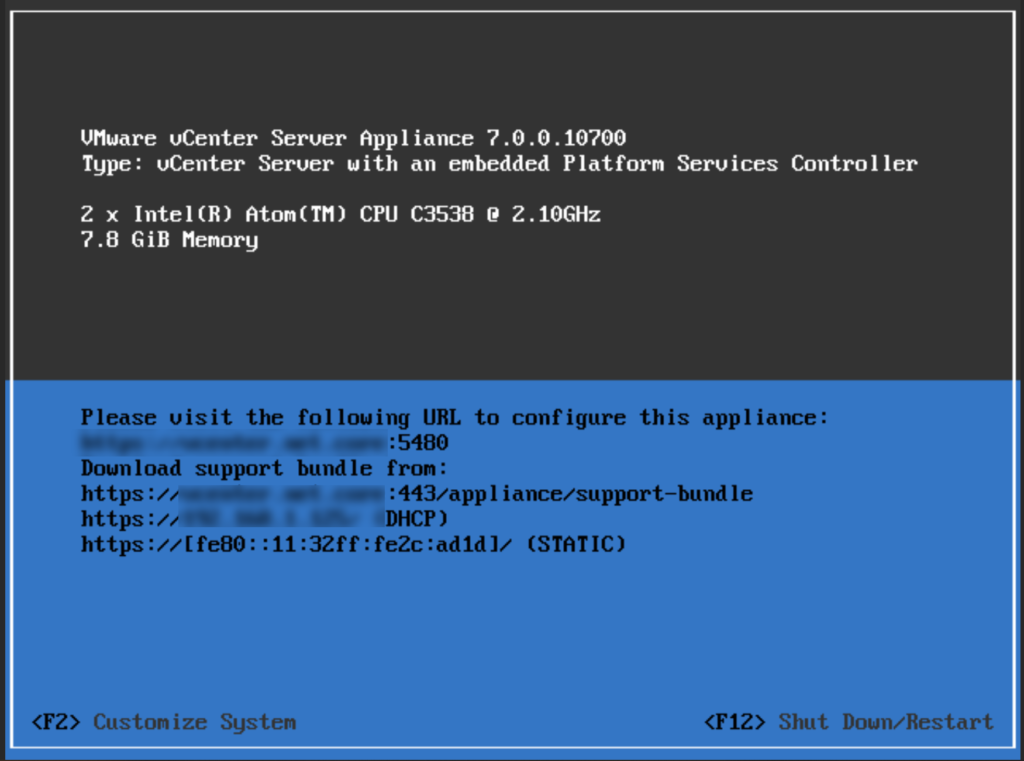
Recently I tried to run a VMware vCenter Appliance (vCSA) on my Synology. Trying to import the provided OVA File results in an unplausible error, so I tried to convert it with the OVFTool thats provided by VMware on the installation disk. I converted or extracted the vmdk diskimages via OVFTool, its basically achieveable by calling ovftool.exe <ova> file.

After that I imported all vmdk images to my Virtual Machine Manager via Images -> Disk Images and started “importing” a virtual machine with the uploaded diskimages. Sadly Synology limits the maximum vDisks for new and imported virtual machines to 8. This is not a hard limit as Virtual Machine Manager is run by qemu and qemu limit is 256 disks.

So how about trying to add the disks after the virtual machine creation via command line? I was messing around with this but the vdisks are added via virtio-scsi and I found this hard to add the disks manually.

So lets see if we can achieve this a different way. I analysed the JavaScript used by Virtual Machine Manager. This can be found here “/volume1/@appstore/Virtualization/ui/virtualization.js”. There is even a check in it, that prompts you with an error if a machine has more than 8 vDisks. So how can we increase the maximum virtual machine attachable disks?

TL;DR

Open “/volume1/@appstore/Virtualization/ui/virtualization.js” and edit the value of “this.maxVdiskNum=8” from 8 to 16. Save the file, gzip it again via gzip -k virtualization.js and restart Virtual Machine Manager or your whole NAS.

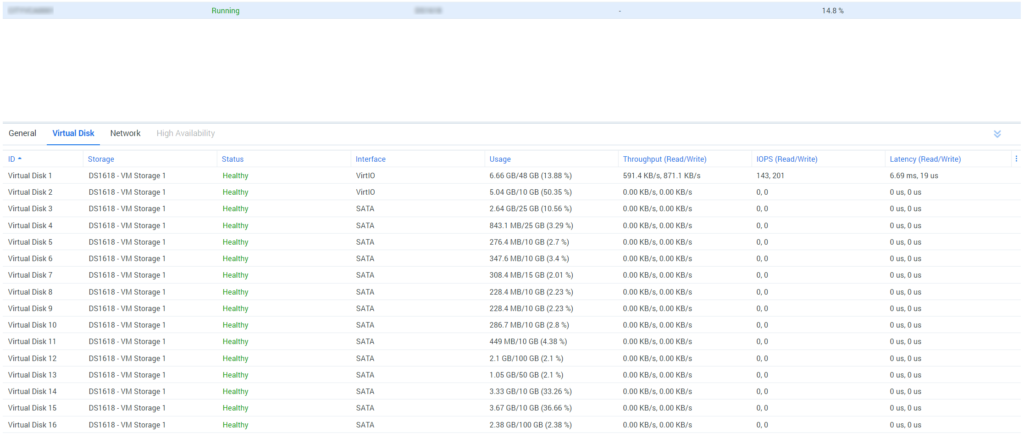
However for a vCenter it takes sometime to setup the machine. Keep the first two disks with VirtIO and all other disks on SATA Setting.

Good Luck.

Posted in: Synology, vCenter, VMWare / Tagged: QEMU, Synology, vCenter, Virtual Machine Manager, VMWare

Support This Site

If you like this content, you can buy me a coffee

Recent Posts

  • Super Famicom/Super Nintendo xBAND XBⱯND – Teardown
  • Gigabyte ITE IT5701/ 5702 Firmware Archive
  • Speed-Up/Tune Synology DSM with HDD & SSD
  • Dreamcast – Skies of Arcadia – PAL – 60Hz – VGA Patch
  • Running Sierra Wireless EM7455 on FreeBSD/OPNSense/pfSense

Recent Comments

  • Raoul on Running Sierra Wireless EM7455 on FreeBSD/OPNSense/pfSense
  • XeroX on Running Sierra Wireless EM7455 on FreeBSD/OPNSense/pfSense
  • Raoul on Running Sierra Wireless EM7455 on FreeBSD/OPNSense/pfSense
  • Raoul on Running Sierra Wireless EM7455 on FreeBSD/OPNSense/pfSense
  • XeroX on Running Sierra Wireless EM7455 on FreeBSD/OPNSense/pfSense

Archives

  • January 2025
  • July 2024
  • October 2023
  • February 2023
  • November 2022
  • September 2022
  • September 2021
  • August 2021
  • November 2020
  • November 2015
  • June 2015
  • February 2015
  • August 2014
  • June 2014
  • March 2014
  • February 2014
  • January 2014
  • November 2013
  • September 2013
  • August 2013

Categories

  • ESXi
  • FreeBSD
  • Hardware
  • Hyper-V
  • iOS
  • Microsoft
  • Nintendo
  • OfficeWebApps
  • Operations Manager
  • Retro
  • SharePoint
  • Synology
  • Teardown
  • vCenter
  • VMWare
  • Webserver
  • Windows Server
© Copyright 2025 - Techspark
Infinity Theme by DesignCoral / WordPress